

What Are Reason Codes?
In our video on RMA Entry (linked here), I mentioned a tab called the Reason Codes tab. While you enter your RMA, you may find that the Reason Codes tab is disabled! This is a feature that is either enabled or disabled by your P21 System Administrators. A Reason Code is a code you enter to explain the reason for a Lost Order (order cancelation, cancel quantity, change quantity, etc.). Using Reason Codes is not required to entire an RMA, as it is an additional feature.
If you’re an average user googling this question because you can’t open the tab, don’t worry! Your company more than likely doesn’t use Reason Codes. However, if you’re an admin looking to enable the tab, follow the instructions below!
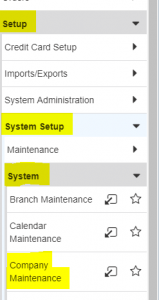
Navigating to Company Maintenance
First, to enable the tab, you’ll want to go to the Company Maintenance window in P21. In order to do that, open the Setup module. Then, open the System Setup submodule. After that, you’ll open the System folder. From there, just go ahead and open up Company Maintenance. Check out the photo on the right to see the complete path!
Enabling Reason Codes
In order to activate the tab, we’ll first have to locate the setting within Company Maintenance. To do that, enter the Company ID you want to add Reason Codes to. Then, go the expanded menu on the far right of the screen. From that menu, select the “Lost Sales” tab.
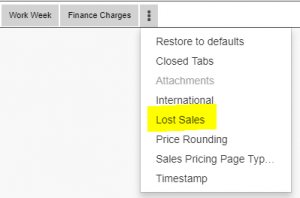
From this tab, check off the “Enable Lost Sales Reason Code Posting” checkbox. Below the checkbox is the Reason Codes Posting Area. These are all of the windows that you can use the Reason Codes tab. You can play around with these and figure out what works best for your company! We have many different available combinations to choose from.

For Posting Actions, you can choose between Prompt or Auto-Approve. Prompt is going to prompt the user to choose the Reason Codes for the lost sale before completing the action. Auto-Approve will automatically set the Reason Codes with no further input from the user. However, when you set it to Auto-Approve, you do have to choose a Default Lost Sales ID. If you enter a Posting Area that you no longer want or need, check off the delete checkbox and then hit save.
Creating and Maintaining Lost Sales Codes
Now, the codes that you enter for Reason Codes aren’t called Reason Codes. They are actually called Lost Sales codes! So, when you need to enter or maintain a Lost Sales code, you’ll want to go to Lost Sales Code Maintenance. From there it is pretty straightforward.
If you want to set the status of an existing code to Inactive, enter the code in the Lost Sales ID field. Then, set the status to Inactive and hit save. To create a Lost Sales ID, enter a nonexisting code in the Lost Sales ID and enter the description. After that, just hit save.

Check Out Our Social Media!
If you have any further questions, drop us a note in the contact box. We also have a YouTube channel (linked here), where we post P21 related videos every week!


